Showing posts with label DIY. Show all posts

Tuesday, December 17, 2013

DIY Glass Etching

I have a handful of tea glasses and some that I use all the time, but I have wanted to "spice" them up a bit. They are very simple and plain and I have had plans on doing something to them, but just haven't had the time. Today I decided I would test my idea out on a glass cup (former candle from Ikea) to see if my idea would be even possible and if it would look nice.

My idea: etching flower patterns onto the glass. Yes, cause I have nothing better to do with my time :D


Here's what you will need:
  • Armour Etch - etching cream
  • Sponge brush - any brush will work
  • Stencils - I used Martha Stewart Blossoms
  • Rubbing alcohol (isopropyl alcohol)
  • Gloves - optional, but this stuff is toxic
  • Painters tape - optional, but good to tape off areas you want to prevent etching
I didn't do this, but I would recommend taping off the area around the stencil to prevent any drips ending up on the clean parts of the glass.

Directions:
  1. Clean the glass with rubbing alcohol to remove any fingerprints and dust.
  2. Apply the stencil. I had sticky stencils so it made life a bit easier. I used two separate stencils and applied them separately.
  3. Mix the bottle of etching cream well.
  4. Apply Armour Etch carefully with the brush (avoid drips). Be careful not to get any on the outer edge of the stencil. This was hard. I should have just taped the edges.
  5. Leave the etching cream on for 5 minutes. The directions said no longer than 1 minute, but that didn't do anything, so I left it on for 5-6 minutes. It was enough time. 
  6. Wash off in the sink with luke warm water. Remove all the cream.
  7. Remove the stencil carefully. Add the second stencil and repeat steps 3-6.
  8. Voila, you have an etched cup :)


I used two of the brushes to hold the cup from rolling.
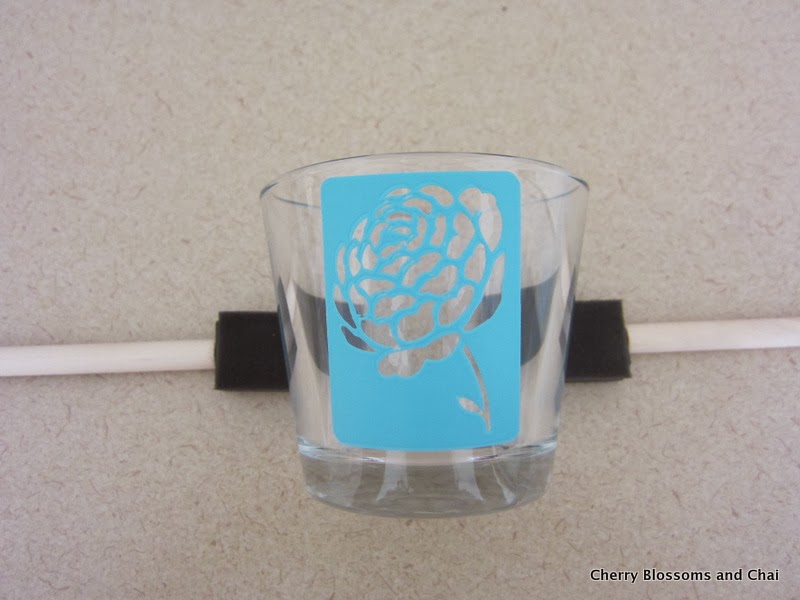
Apply the cream to make sure you cover every inch of the stencil. The more the merrier. As you can see, the cream was very close to the edge of the stencil. This is why I say, tape the edges with painters tape. I didn't have any and was too lazy to go buy some. Tsk tsk!

One stencil down...one more to go...

I would do one stencil at a time. I wanted them close together and I also didn't want to fuss with cream running off the edge of the stencil because of the curvature of the cup.

It's hard to see, but it looks fabulous, if I do say so myself :D


 Yay!!! I really like them. So, now onto the real tea glasses. 0 down, 12 to go.


DIY Gift Bag

We had a white elephant gift exchange at my work and we were also celebrating one of the post-docs in my lab leaving for bigger better things. Celebrating isn't the right word, as she is going to be greatly missed and it was a hard leave for her as well, but alas, tis life.

I put together a few things for her on behalf of the lab, but I realized too late that I didn't have an appropriate gift bag for the white elephant gift, nothing Christmas related or festive enough, so I had to improvise.

I had bought a handful of plain bags a while back and I also had a ton of bows that I have been using slowly, but not fast enough. If I put the two together...

Voila, my very festive gift bag!
  
Plain paper bag

Plain paper bag with bows

Yes, I think it works and I think I like it. What an earth shattering idea I tell you, just earth shattering!!!


:)

Thursday, July 4, 2013

Washi Tape Plumbing

I love washi tape...I totally need to get me a handful of different colors...oh the things I could do with them. 

Megan from Honey We're Home came up with a fabulous idea for hiding your ugly plumbing under the sink. I'm so tempted to do this...
  

Before:

After:

Oh it's soooo pretty! I am in love with it! This is on my definite to do list someday when I have my own house. But, I can hear my civil engineering father now..."and what happens if the pipe gets clogged and you need to open it"...that's what back up washi tape is for! :D


Monday, July 1, 2013

DIY Cord Organizer

I hate messy cords (well anything messy really) and I hate not being able to ever find a cord that I need, when I need it. Our cords were spewed across various drawers and I just couldn't take it anymore. I decided that it was time to organize the cords (chargers for kindle, ipod, external hard drives....) all into one nice and neat box.

Oh, it brings tears to my eyes...it's so organized!

All you need:
A box (mine is 8" x 8") or any size box that will store all your cords
Cardboard box to cut into size as inserts
Pretty paper
Ruler
Glue/tape
Scissors
 My nice little box


I cut 3 inserts from a cardboard box to make 6 slots in the box.
 All inserts were 4.5" high x 8" wide. Cut 2 slits into all three pieces so that they fit into each other nicely.

Cover with pretty paper or cardstock.

 Fit into the box like so... 

 Organize your cords from this:
To this:

and....Voila...a beautiful masterpiece of organization!

All nicely put away on the shelf for use when needed.

I used these velcro self gripping strips/cable ties to organize the cords. A packet of 100 (comes in a total of 4 rolls) was $7 on Amazon and they're reusable and work for all shapes and sizes of cords. They're wonderful...I've already used one roll on all the things I could find in the house that could use wrapping.

They are pre-cut 8" long strips that come on a roll. You just need to peel off a piece and you're good to go.

Happy Organizing!

Tuesday, May 21, 2013

DIY Cake Banner

Here is how I put together the banner for the cake I made for my husbands birthday.  It was really easy to make and actually looked really cute (even though it was lopsided). 

Now, it's not the best looking banner, that's for sure. I ran out of twine and (being the procrastinator that I am, well, just been busy), I didn't have time to run out and get more. So, the banner ended up being slightly lopsided, but it fit nicely with the theme I was going for with the cake.


What you need:
  • Colored paper (not construction, as it will be harder to fold)
  • Tacky Glue
  • Twine
  • Coffee mixer sticks (or any stick really)
  • Sharpie/pen
  • Scissors

1. Draw out a triangle shape on a piece of a paper and use that as a guide to cut out more.
2. Fold your paper in half, so that when you cut you can get a long diamond shape, that's been folded over. Cut out as many as you need, in whatever color you like.


3. Write out your message on the small banner pieces you've just cut out.


 4. Add a dab of tacky glue on the inner side of the banner shaped pieces and fold them over the twine. 


5.  Attach the twine to the sticks, so that the banners fall nicely. I ran out of twine, make sure you have enough, so you can stretch out the words nicely and neatly. Cut off the excess twine on the sides.


Tuesday, February 26, 2013

Shawl Re-Sizing

As a hijabi, i'm always on the lookout for cute shawls (I prefer shawls over scarves) but sometimes the shawls are way too big for my taste.  I have a few that are extra extra large/long but that I still buy because they were really cute and colors I need (you know...outfit matching and all).  I was getting tired of having to figure out ways to wrap them so that they sat well and at the same time avoiding the extra puff around my neck.  So, I decided to cut them...I mean DUH right, but I was worried about them unraveling since they are a knit cotton.  But, I decided to give it a try.

Here's what I did:

 I have a handful of these that are super cute but big.

 Like SUPER SUPER big.

I took a shawl that I always wear (a size I like) and lined it up with the larger shawl.  I cut about an inch away from the size I wanted to add a small hem. 

 I sewed a small zig zag pattern the length of the cut hem, to prevent it from unraveling.  Keep the fabric really tawt on both sides while sewing as this kind of fabric can tear very easily 

 See those stringy things...yup that stuff can cause the whole shawl to unravel.

 I rolled the hem over twice and ironed it down.

I re-sewed using a straight pattern and ironed the hem down again to remove the "bumpy" look.


 They feel like new :) I can now wear my favorite scarves comfortably!!

Wednesday, February 6, 2013

Cleaning Your Washing Machine

Over the past year I'd noticed there was a rim of black around the top of my washing machine. I don't know if it was dirt, grime, or just stained, but it was starting to look pretty bad and embarrassing. I was inspired to clean it after reading this post.

It took a few hours, but here are the steps.

1.  Using a magic eraser, clean the stains around the rim of the washing machine.
2.  Fill the washing machine with HOT water.
3.  Add 4 cups of bleach, allow to agitate for a few minutes, then allow to sit for 1 hour.
4.  Allow the machine to run through it's longest cycle.
5.  Fill the machine with HOT water again immediately.
6.  Add 4 cups of white vinegar and allow to agitate for a few minutes, then allow to sit for 1 hour again.
7.  Run the longest wash cycle again.
8.  Rinse the machine with HOT water for one 1/2 cycle to complete.
  A clean and happy washing machine :o)

LinkWithin

Related Posts Plugin for WordPress, Blogger...