Showing posts with label Cooking. Show all posts

Wednesday, July 17, 2013

Homemade Lebanese Hummus

I finally got around to organizing my kitchen cabinets so as to make more room for my food processor. It was previously in it's box in the closet, up high on a shelf I could barely reach and I got really tired of having to take it down and out of the box every time I wanted to use it. With my food processor in easy reach now, I got the urge to make a lot of things, one being homemade hummus, and by homemade, I mean everything from scratch (not the cheat way using canned garbanzo beans).

I had a recipe in mind and made a few changes to my liking and it came out fabulous. I took some home to my parents house and it was all gone within a day, so that's saying something :D 


Note: this recipe is very easy, but just takes a day in advance to prepare.

Ingredients
  • 2 cups dried chickpeas (aka garbanzo beans)
  • 4-5 large garlic cloves, crushed (see below for how to crush garlic)
  • 1/2 cup tahini paste (pureed sesame)
  • 2 tbsp Olive oil (or more to taste)
  • 1/3-2/3 cup of fresh lemon juice
  • 1/4 teaspoon Paprika
  • 1 tsp salt
  • 1 tsp baking soda

Directions:
  • Clean the chickpeas to remove any small stones.
  • Rinse the dry chickpeas to get rid of any debris and then allow them to soak overnight (12-24 hours) with 1/2 teaspoon of baking soda.  Fill the bowl to completely cover the chickpeas. They will expand in size, so make sure to keep enough water to cover them. The baking soda also helps soften the beans quicker.

  • Next day, empty the soaked chickpeas in a colander to get rid of the water and then rinse the beans with fresh cold water.
  • Add the chickpeas to a cooking pot with 1/2 teaspoon of baking soda and then add enough water to cover the chickpeas (about 6-7 cups).
  • Bring it to a boil on high heat, then let it simmer on low heat for about 1 hour with the pot covered.
  • Check up on the chickpeas after 45 minutes. To tell if the beans are done: try to crush a chickpea with your fingers, if it crushes easily and feels smooth then it’s done.
  • Once the chickpeas are cooked, and while still hot, add them immediately to a food processor with 1/2 to 1 cup of warm water and grind for 3-5 minutes at low speed.
  • With the food processor still going, add the salt and garlic.
  • Slowly add in the Tahini paste.
  • Next, add the lemon juice and let the food processor run for a couple more minutes. 
  • Add the paprika and olive oil and continue to allow the food processor to run.
  • Taste the puree to see if it needs an adjustment of salt or olive oil. 

FYI: To crush garlic, here is a neat trick I learned:


 Mince the garlic into tiny, itty bitty small pieces and add a pinch of salt.

Then, using the edge of the blade of a knife, with firm pressure on the blade, drag the knife across the garlic back and forth, crushing the garlic so it's smooth like a paste.
 And voila, you have crushed garlic.

-------------------------------------------------------------------------------------------------------------------------------------------

RECIPE:

Ingredients
  • 2 cups dried chickpeas (aka garbanzo beans)
  • 4-5 large garlic cloves, crushed (see below for how to crush garlic)
  • 1/2 cup tahini paste (pureed sesame)
  • 2 tbsp olive oil (or more to taste)
  • 1/3-2/3 cup of fresh lemon juice
  • 1/4 teaspoon Paprika
  • 1 tsp salt
  • 1 tsp baking soda
Directions:
  1. Clean the chickpeas to remove any small stones.
  2. Rinse the dry chickpeas to get rid of any debris and then allow them to soak overnight (12-24 hours) with 1/2 teaspoon of baking soda.  Fill the bowl to completely cover the chickpeas. They will expand in size, so make sure to keep enough water to cover them. The baking soda also helps soften the beans quicker.
  3. Next day, empty the soaked chickpeas in a colander to get rid of the water and then rinse the beans with fresh cold water.
  4. Add the chickpeas to a cooking pot with 1/2 teaspoon of baking soda and then add enough water to cover the chickpeas (about 6-7 cups).
  5. Bring it to a boil on high heat, then let it simmer on low heat for about 1 hour with the pot covered.
  6. Check up on the chickpeas after 45 minutes. To tell if the beans are done: try to crush a chickpea with your fingers, if it crushes easily and feels smooth then it’s done.
  7. Once the chickpeas are cooked, and while still hot, add them immediately to a food processor with 1/2 to 1 cup of warm water and grind for 3-5 minutes at low speed.
  8. With the food processor still going, add the salt and garlic.
  9. Slowly add in the Tahini paste.
  10. Next, add the lemon juice and let the food processor run for a couple more minutes. 
  11. Add the paprika and olive oil and continue to allow the food processor to run.
  12. Taste the puree to see if it needs an adjustment of salt or olive oil. 
  13. Serve with more paprika or olive oil. 
Bon Appetite :)

Thursday, April 18, 2013

41 Olive

The other day, the hubby and I made a visit to this new store that I've been wanting to show him for quite some time now.  We are a big fan of olive oil and balsamic vinegar, so when I came acoross this place, I knew it was made for me :D In case i'm ever lost and you can't find me, I will be here, sampling all the various oils and vinegars and just enjoying myself.

41 Olive is a specialty store that is lined, wall to wall, with a huge variety (41 to be exact) of flavored extra virgin olive oils and balsamic vinegars.  If you are a lover of oil and vinegar, this is a place to check out.  The most amazing part, besides the variety of options to chose from and free sampling with bread, is the ability to mix and match flavors to make something unique and fabulous.  This place is amazing and to die for, and if you ask me, the price is worth it.  Definitely makes for a great gift for someone (or even yourself, hehe). 

We bought the smaller sample sizes (for now, cough!) which seem to only be available in store.  It was a hard decision, but we finally decided on 2 oils and 2 vinegars. 

1. Cranberry pear white balsamic vinegar
2. Pomegranate balsamic vinegar
3. Organic persian lime olive oil
4. Meyer lemon olive oil

So far, i've only tried these on salad, but you can use them to marinate chicken or fish or just have them with bread alone.   

The mixes we've made are:
1 and 4; cranberry pear white balsamic vinegar with meyer lemon olive oil
2 and 3; Persian lime olive oil with pomegranate balsamic vinegar.

So, if you ever find yourself making your way to this store or even buying online, try these options if you can't make up your mind.  I promise you'll love them.   


Tuesday, March 12, 2013

Bag in Flour/Sugar Dispenser

I've been looking for a practical way to store my sugar and flour so that they are safe from (guess...ants!) and that are easy to pour when you need them, without the mess.  You know, when you're trying to pour flour or sugar from the bag, you usually end up getting stuff all over everywhere...at least I do.  I was super excited when I saw this plastic dispenser that could be used for flour or sugar and that was designed so that you could pour with a spout straight out of the bag.  Sounds too good to be true huh?


A 5lb bag fits right into the container.

Just cut the paper bag flush with the outer rim of the plastic container.
 

Put the lid on, so that it fits inside the paper bag...
 

And, voila! Flour straight out of the bag...without the mess...

NOT! Yup, too good to be true.  The lid doesn't sit on the container tight enough, and as I was trying to get the flour out of the spout with a tapping action, this is what happened! It's a brilliant idea, but needs some major work!  AHHHHHHHH!  

Man...the clean up was a pain. I should have put my ice cube tray somewhere else while I was testing this thing.  Arg!


So, here is my review of this product.  Buy at your own risk, haha!

Pro's:
1. You don't have to pour the flour or sugar out of their bag, as it does hold the bag inside it pretty well.
2.  As long as you don't try to pour using the lid, it's a great container for storing flour...I suppose.
3.  It's great for sugar, as sugar pours out of the spout easily, but I would hold the lid just to be safe.
4.  It's easy to clean.

Con's:
1.  The flour doesn't pour out of the spout whatsoever. You either need to take the lid off, or use the larger opening to scoop flour out.
2.  It only fits a 5lb bag of flour or sugar, anything smaller or bigger will cause problems. So, Costco shoppers...you're screwed!
3.  The lid doesn't sit on tightly or securely. You need to hold the lid down with your hand if you're going to attempt to use this product as it's intended.
4.  You can't stack these containers on top of each other, so they do take up a lot of space.
5.  If you don't cut the bag opening correctly, the lid will sit on even worse than before and then you're going to have problems.

I would return them, but for now I'm just going to keep it and use them as storage containers. They work as just that.   

Tuesday, January 8, 2013

Pasta Salad

Here's a recipe for a quick and easy cold pasta salad.  You can add anything you like, but I used what I had in the fridge.

Ingredients:
Pasta 
Bell Peppers
Olive Oil
Mayonnaise
Garlic Powder
Salt
Pepper
Parsley

Directions:
  • Cook the pasta
  • Dice up the bell peppers
  • Add oil, 2-3 big heaps of mayo, a dash of garlic, salt, pepper and parsley to taste.

Super easy, super fast and uber yummy! My kinda lunch!

STEAM...woooh!


It was delicious, the only bad part, I can't just have one bowl :D


Friday, December 14, 2012

Homemade Pancakes

My husband was off today and I decided not to go to work either :D I mean...go to what?  Anyways, it was a cold, cloudy, drizzly day, and so I decided to make pancakes.  YAY for comfort food!  

I can't remember where I found this recipe, but it is one of the best simple recipes for puffy pancakes that I've tasted, EVER!  You can of course add nutmeg, cinnamon or fruit to your mixture, per your liking.   I decided to keep it simple this time.  This recipe FYI is enough for two people.  I've tripled the recipe before, when I made it for 6 people.

Ingredients:

1 1/2 cups of white flour
3 1/2 tsp baking powder (make sure it's a fresh batch or the pancakes won't puff)
1 tsp salt
1 tbsp sugar

1 1/4 cup milk (I used Lactaid because my husband in lactose intolerant)
1 egg ("organic" preferably)
3 tbsp butter

Directions:
  • Sift the flour, baking powder, salt and sugar
  • Make a well in the center of the flour mixture
  • Add the milk, egg and melted butter to the center
  • Mix, don't mind the clumps.

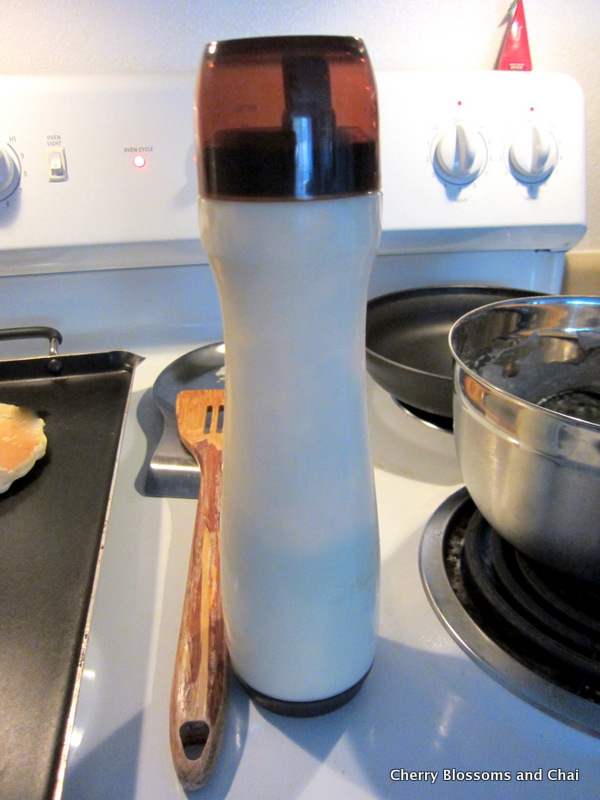
 I have a cool/useful pancake batter dispenser.  I got mine at, guess...TJMaxx, but they also sell it at Crate and Barrel.  It works pretty well to make nice circular pancakes. 

 I didn't take a picture of it, but I have a large rectangular griddle from Bed Bath and Beyond that covers two burners, so I can make nice pancakes, 2 at a time.  Or three, although the center doesn't get as hot.  
  
 My letter making abilities though clearly need some work.

Pancake warmer

 Syrup in a creamer.  I got this at Anthropologie a while back.  I just loved the little bird.

 BIG BIG TEA...YES! 

This is how the hubby eats his pancakes...chomp chomp...

This is how I do it...tehehe.

HAPPY FRIDAY EVERYONE!

Monday, October 22, 2012

Homemade Quesadilla's

After a long day at work...the last thing you want to do is stand for hours to make dinner.  Here is another quick idea for something easy, fast, and yummy.

Ingredients:

Tortillas (white or wheat)
Thinly sliced tomaotes
Shredded mozzarella cheese
Shredded cheddar cheese

Taco sauce: I use La Victoria's red and green mild sauce


1. Warm the tortilla in a frying pan...just toss it back and forth till it's a bit warm.

2. Drizzle the sauce.

3.  Add the tomatoes.

4.  Add the cheese.


5.  Fold the tortilla over and flatten.  Turn over a few times until all the cheese is melted and the tortilla is crispy and golden.

 6.  Cut into slices.

Bon Appetite!! :)

LinkWithin

Related Posts Plugin for WordPress, Blogger...